Here is a shoji in Collin's apartment. I have helpfully labeled it according to the different ways in which I have destroyed it.

If you don't know what a mukade is, it is a Japanese centipede that is poisonous. Getting bit by one can result in fever, vomiting, swelling, and death (for very small babies).
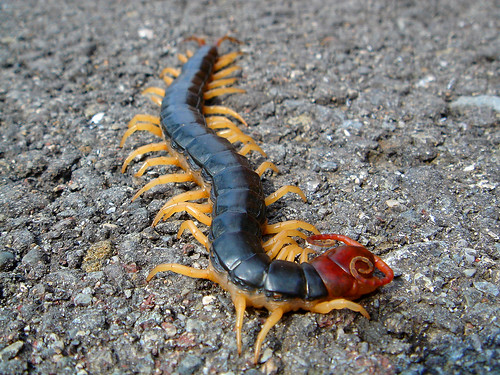
Heyo! I don't do well with not freaking out upon seeing a mukade making headway towards my bare feet. Cockroaches are gross but they mostly aren't poisonous, eh? Anyway I think I get a freebie for the mukade hole in the shoji. The backpack, not so much. That was pure idiocy.
Anyway, it occurs to me that it is kind of sad for the new person inhabiting Collin's apartment to be forced to deal with the ratty destroyed shoji directly upon arrival. When Sarah moved into her apartment in Osaka, the previous JET had put flowers on the table and left a little note for her. Not that I am going to be doing that, but, you know. Intact doors might be nice.
So! I googled "how to replace shoji." The process is relatively simple if you are not an idiot, like me. Here is how you do it!
Step 1. Find some destroyed shoji. These shoji were already destroyed and I didn't even have anything to do with it! Go me.

Step 2. Get some tools. The tools will not help you. You don't need any tools for this. But you will feel like a badass carpenter and maybe as you are ungluing paper and gluing new paper to wood you will convince yourself that some new power tools would be cool. Maybe you could build all the furniture in your new house, you know, the one that you will live in when you finally have a job and some stability in your life. Maybe you will get a dog. Maybe you will build that dog a doghouse with your newfound carpentry skills! Sorry, I'm monologuing again. Also, I'd like some power tools for my birthday. Anyone?
Also, for Step 2, you might want to make a makeshift tarp out of a couple garbage bags. Getting tatami wet is no joke, and since you are a clumsy ass (see the title of this post), you will get water everywhere.
 The only thing you really need in this picture is the bottle of starch glue. Actually, you don't even need that if you make your own rice glue. (Which I didn't.)
Step 3. Get the paper wet. This will dissolve the glue that attaches the paper to the wood frame and will allow you to gently (or, with reckless and bloodthirsty abandon) remove the paper. The brush in the tool picture will help you do this without getting water all over the tatami. Hot water is best.


Step 4. After pulling the paper off, there will still be little bits of paper stuck to the wood. You will momentarily freak out and curse and wonder why you started this idiot project five minutes ago. After that, get a gross old towel, dip it in the hot water you're using to get the paper wet, and rub it gently on the wood until the paper comes off. I'm not sure if that orange color is wood stain or the color the glue gets after several years. It comes off pretty easily, in either case.


After taking off all the paper your bucket of hot water will be a disgusting color. You will also have droplets of brown water all over your makeshift tarp. Throw the paper away. You may mourn, because after all, the paper was your friend, and also your neighbors' friend, providing a barrier between your tired, disoriented and possibly partially undressed ass and the rest of the way more responsible neighborhood.

Step 5: Care for the wood lovingly.
After removing the paper you will notice that the wood looks kinda rough and destroyed in places.

I saw a couple YouTube videos where this was explained to be extra glue. But I'm pretty sure it isn't. I am pretty sure that it is just what happens to really soft cedar (which is what shoji are made of) when it gets glued and unglued to things over the course of several years. This is actually the softened grain of wood. If you keep rubbing it, it will get worse. Wait until the wood dries (it will probably take a while) and then, if it's really rough and really bad, use a little sandpaper to very gently and very carefully remove the bumps. This is also what I do when I get razorburn on my legs, so I already had the sandpaper. (Not really. I have to use a belt sander for my legs.)
OK! So. Here we are. One shoji frame without paper. Do not step blithely across the room, putting your foot in an empty square and just going "Oh man I am so graceful and will not trip and fall and break all of the wooden slats." Don't do that.

Step 6. It is time to Apply The Glue. I got a 115-yen (about $1.20) bottle of starch glue specifically for shoji. I am certain that this sort of thing is common all over Japan. If you are feeling like you really want to do this the Right Way, you can make your own damn rice paste glue. Just don't use Elmer's or something like that, because it will make it a lot harder to get the paper off when you want to replace it again after seeing another mukade or drinking or inviting a small child/animal into your house.
Oh, I forgot a crucial part of this. You should buy new shoji paper. You can buy all different kinds, some with beautiful patterns and designs. Or you can go to Daiso and spend about $1.20 on a tube of plain white paper. That is what I did.

It's important to try to get the glue at all points on the frame. If you don't, there will be wrinkles in the paper where there is no glue.

Roll the paper from one end to the other, smoothing the paper over the wooden frame with your finger. Start in the middle of the frame and work your way outwards towards the edges of the frames so that the paper fits the frame and you don't have extra, which will cause wrinkles.
When you are done, there will be a border of paper that is larger than the frame of the shoji. Use an X-acto knife to cut the extra, but don't push too hard, otherwise you will create a groove in the incredibly soft wood. Seriously. This stuff is like balsa or something.
Ideally you should wait until the glue dries to do this, otherwise the razor will tug on the paper and create more wrinkles. But chances are, you're impatient and decide, "screw that."

Step 7. Spray your newly papered shoji with water from a water bottle. As the paper dries, it will shrink and the wrinkles that are in it now will (hopefully) disappear.

Step 8. Use the world's oldest and dustiest fan to dry your shoji.

Step 9. Bam! Shoji.

Make sure you brag about these a lot and try not to notice the wrinkles that didn't go away because you got too anxious and couldn't put the paper on correctly. Make sure that everyone who visits your place is forced to admire your handiwork. Maybe even write a blog post bragging about it.


No comments:
Post a Comment